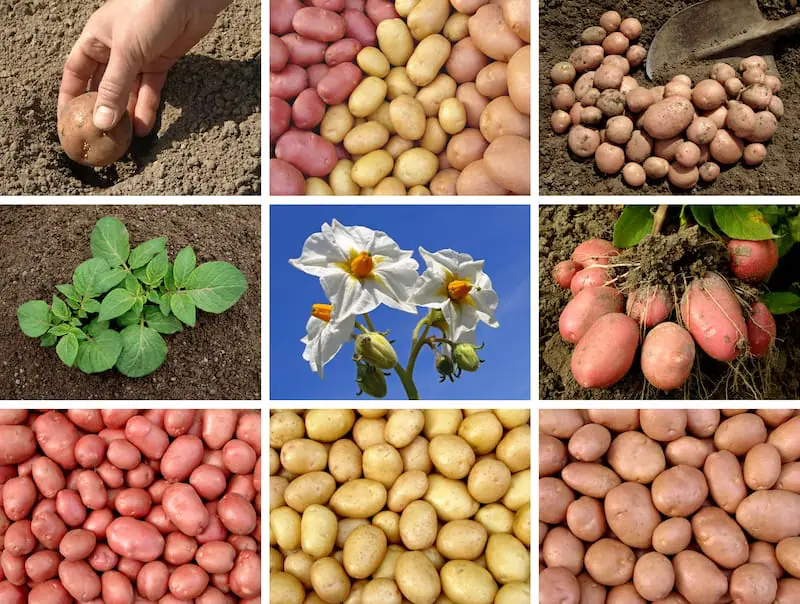
I’ve grown potatoes in just about every setup a home garden can offer—trenches, grow bags, raised beds, and once, a straw pile that looked like a barn collapsed in the yard. No matter how tidy or improvised the method, the moment you sink a fork into the soil and feel that clunk of a potato underneath, it still hits with the same kind of surprise as finding something you didn’t remember hiding.
Growing potatoes can be simple, but they’re not mindless. A few things matter a lot more than people think: the growth habit of the variety, the pH of your soil, how steady your moisture stays, and the way you treat the tubers after harvest. Once you understand those pieces, your harvest changes—usually for the better.
I. Getting Set Up: Variety, Habit, and Everything That Happens Before Planting
Most people think the hard part of potatoes starts at planting, but the truth is your harvest is already decided by then. The type of potato you pick and the way that plant forms tubers underground—those two choices shape your season more than anything else you’ll do with a shovel.
A. Growth Habits: Determinate vs. Indeterminate (The Part Most Guides Skip)
Potatoes grow by their own rules, and if you don’t know which “rulebook” your variety follows, it’s easy to over-hill or under-hill and lose yield without realizing it.
Type
How Tubers Form
Hilling Needed
Best For
Determinate
One shallow layer, right above the seed piece.
Not much—one or two hillings.
Grow bags, smaller gardens.
Indeterminate
Tubers form along buried stems at multiple levels.
Regular, deeper hilling for bigger yields.
Trenches, raised beds.
Determinate types do well in confined spaces because they don’t climb much. Indeterminate potatoes behave like they’re trying to build a storage tower underground, so they need depth—real depth—not the eight inches most people give them.
B. Choosing the Right Variety
I group my potatoes by how I cook and store them. It keeps things simple.
Category
Days to Harvest
Best Use
Examples
Early
60–80 days
Thin-skinned, fast, great fresh.
‘Yukon Gold’, ‘Red Norland’
Mid-Season
80–100 days
Flexible, good everyday cooking.
‘Kennebec’, ‘All Blue’
Late (Storage)
100–130+ days
Thick skins, long-term keepers.
Russets, ‘German Butterball’
A small patch can hold all three if you plan right. Early potatoes for summer meals, mid-season for that steady supply, and a late storage type if you want something that actually lasts past the holidays.
A quick note: store potatoes from the grocery store might sprout, but they come with baggage—disease, sprout inhibitors, and a handful of other surprises. Certified seed potatoes cost more but save you problems you don’t want.
C. Chitting (Pre-Sprouting)
I don’t chit every year, but when I do, the plants pop up evenly and the whole bed settles into the season quicker.
Set your seed potatoes in a bright, cool place—50–60°F is perfect—with the eyes facing up. Those little nubs will grow into stout, dark sprouts if the light and temperature are right. Long, pale sprouts mean things are too warm or too dim.
Plan four to six weeks ahead if you want that head start.
II. Soil, Timing, and the Part Where You Actually Plant
Potatoes are honest. If your soil is poor, they’ll show it. If the pH is off, they’ll show that too. And if you load them up with nitrogen, you’ll grow a jungle of leaves and almost nothing underneath.
A. Soil Prep: The Real Foundation
Texture and structure Potatoes in raised beds want soil that lets them move. Loose, crumbly, and well-drained. If your soil crusts hard after rain or compacts into bricks by midsummer, you’ll end up with crooked or stubby potatoes. Clay-heavy plots are usually better handled from a raised bed, unless you’re willing to add compost like it’s a second job.
Scab and pH Common scab isn’t a disease you “catch”—it’s a soil condition. It loves alkaline soil. If your pH drifts above 5.5, scab takes the hint and moves in. Doesn’t hurt eating quality much, but it’s not pretty.
The sweet spot for potatoes is pH 5.0–5.5. If you’re running high, a fall application of sulfur or a good dose of peat can nudge things down.
Skip fresh manure—it’s basically an invitation for scab.
Feeding Potatoes don’t need a lot of nitrogen. What they want is balance: enough phosphorus and potassium to build tubers. Organic fertilizers in ranges like 4-2-2, 3-4-4, or 5-10-10 treat them well. I usually give the plants a little compost mid-season once they’ve put on a foot of growth. Not much—just enough to keep them from stalling.
B. Timing: When Soil Says “Go Ahead”
You can plant by the calendar or you can plant by the soil. The soil is more honest.
Potatoes can handle cool weather, but they don’t love being planted into cold, wet dirt. 45°F (7°C) is the earliest temperature where I’d call it safe, but things move quicker at 50°F (10°C).
Below 40°F, the eyes can twist and curl underground, and that mess of confused sprouts produces weak plants later. I’ve learned to wait for steady warmth instead of the first warm spell.
Most gardeners plant potatoes 2–4 weeks before their last frost, but a hard freeze on new growth will knock the plants back. If that happens, you can always pull soil or straw over the sprouts for a quick save.
C. Cutting and Callusing
Small seed potatoes go straight in. Big ones get cut.
Each piece should be about the size of a golf ball with two or three eyes. After cutting, let the pieces sit somewhere dim and cool for a couple days so the cuts dry into a leathery skin. This little waiting period makes a big difference—cut surfaces heal, and rot becomes a lot less likely.
III. Planting Methods and Hilling
Potatoes grow in all sorts of setups, and none of them are wrong. Some just suit certain soils and spaces better.
A. The Classic Trench Method
If you’ve ever watched an old-timer plant potatoes, this is probably what they did.
Dig a trench 6–8 inches deep.
Lay the seed pieces 10–12 inches apart (go wider for big indeterminate types).
Cover them with 3–4 inches of soil and leave the rest of the trench open for hilling later.
Start shallow, add soil gradually as plants grow. Fill the bag in stages.
No-Till Straw
Easiest harvest, low digging.
Lay potatoes on the soil and bury with a thick straw layer. Add more straw as plants grow.
Grow bags warm up fast, which helps in cool spring climates. They also dry out quickly, which can be a mixed blessing. The straw method, on the other hand, keeps moisture steady and makes harvest unbelievably easy.
C. Hilling: Why It Matters
Hilling does a few jobs at once:
Protects tubers from sunlight
Supports the plant
Makes room for indeterminate types to produce more potatoes
First hill when plants hit 6–8 inches tall. Bury the lower leaves so only the top third shows. Then come back every 2–3 weeks to add more soil, compost, or straw until the mound reaches a foot or so.
This is one of those quiet chores that pays off without much fuss.
IV. Organic Pest and Disease Management
Every season has a few visitors—some helpful, some not. Healthy soil and rotation solve most of it, but potatoes still have their usual suspects.
Organic Troubleshooting
Common Potato Pests (And How to Handle Them)
A quick reference for what you’ll see on the plants and what actually helps in an organic potato patch.
Common Pests in Potato Beds
Use this as a quick scan when you spot damage and want a gentle, effective fix.
Pest
What You’ll See
What Helps
Colorado Potato Beetle
Striped adults on leaves and plump orange larvae clustered on the undersides.
Hand-pick eggs, larvae, and adults and drop them into soapy water. For big outbreaks, use an organic spray with Bt var. tenebrionis (Bt-T).
Wireworms
Clean, round holes or tunnels bored into otherwise healthy tubers.
Avoid planting potatoes right after sod or grassy areas, use whole seed potatoes in problem beds, and add beneficial nematodes to reduce larvae.
Potato Flea Beetle
Tiny black beetles that jump when disturbed, leaving “shot holes” all over the leaves.
Float row covers on right after planting and use a thick mulch to cut down on pressure from the soil surface.
Checking your plants a couple of times a week during peak season goes a long way. Catching pests early usually means you can stay ahead of them with hand-picking and simple covers instead of heavier treatments.
B. Common Diseases
Potato Scab Cosmetic and usually harmless inside, but annoying. Keep soil pH low and moisture steady during tuber set.
Late Blight You’ll see dark, water-soaked patches on leaves that spread fast. Stems can collapse. If you find it, pull the whole plant and don’t compost it. Good airflow and clean seed potatoes help prevent it.
V. Harvesting and Storing the Crop
This is the part you think about when you plant potatoes in spring—the reveal.
A. Harvesting New Potatoes
A couple of weeks after flowering, you can reach into the hill and harvest.
Organic Potato Growing FAQ – The Bright Garden
Quick Garden Answers
Organic Potato Growing FAQ
Planting · Hilling · Harvesting
Common questions on growing organic potatoes, from when to plant to soil, pests, containers, and how to bring your harvest into storage.
The simplest way to think about it is: pick the right variety, give it loose soil and steady moisture, keep the tubers covered, then cure what you dig before you store it.
Pick varieties: Early for tender “new” potatoes, mid-season for everyday cooking, late types if you want a winter stash.
Prep the bed: Loosen soil 8–12 inches deep, mix in finished compost, and aim for slightly acidic soil (around pH 5.0–5.5).
Plant: Set seed pieces 4–6 inches deep and 10–12 inches apart once soil holds about 45–50 °F.
Hill: When plants reach 6–8 inches tall, pull soil or mulch up around the stems; repeat every couple of weeks until hills are roughly a foot high.
Water: Keep the soil evenly moist, especially 2–6 weeks after the plants emerge, when tubers are forming.
Harvest: For storage potatoes, wait until vines completely die back, then dig 2–3 weeks later once the skins have firmed up.
Cure & store: Cure in the dark at 50–60 °F for 10–14 days, then store in breathable containers at 35–40 °F.
The best time to plant potatoes is when your soil has warmed to about 45–50 °F and is no longer heavy and cold. In many gardens, that works out to roughly 2–4 weeks before your average last frost date.
Cooler zones (3–5): Often late April through May, once the soil has thawed, drained, and warmed a bit.
Mid-range zones (6–7): Usually mid-March through early April, with the option for a small fall crop in some spots.
Warmer zones (8–10): Treat potatoes as a cool-season crop and plant in late winter or very early spring so tubers bulk up before hot weather.
If a cold snap threatens after planting, mound extra soil, compost, or straw over the new shoots for a night or two. Potatoes handle chilly nights better when the soil around them is stable.
Potatoes are happiest in slightly acidic soil—around pH 5.0–5.5. That range also helps keep common scab in check, which is the rough, corky skin you sometimes see on tubers.
Test your soil: A basic soil test will tell you where you are now.
If pH is high: Work in elemental sulfur or peat moss several months before planting to gently lower it.
Avoid fresh manure: It can push pH up and make scab worse.
Keep moisture steady: Uneven moisture during tuber formation also makes scab more likely to show.
Scab usually doesn’t ruin eating quality, but if you want smooth skins, keeping pH slightly acidic and moisture consistent is the quiet fix that works.
Soil pHPotato scabSoil prepOrganic fixes
Yes—potatoes do well in containers and grow bags as long as you give them enough depth, good drainage, and more frequent watering than in-ground beds.
Pick the right size: Aim for at least a 10-gallon bag or bucket for 3–4 seed pieces.
Use determinate types: They form tubers in a single layer and are easier to manage in limited depth.
Plant shallow, then fill: Start with 4–6 inches of soil, set the seed pieces, then add soil or compost as the plants grow until the container is nearly full.
Watch water and heat: Bags dry out fast and can heat up in full sun. Check moisture often and consider a light mulch on top.
At harvest time, you usually just tip the bag over and pull potatoes from the mix—no digging required, which is a nice change of pace.
Grow bagsSmall spacesContainer growing
Most potato pests can be managed by walking the rows often, using a few simple tools, and keeping plants healthy so they bounce back from damage.
Colorado potato beetle: Check undersides of leaves for yellow egg clusters, then crush or remove them. Hand-pick striped adults and orange larvae into a bucket of soapy water. For heavy outbreaks, an organic product with Bt var. tenebrionis can help.
Flea beetles: Tiny black beetles that leave “shot holes” in leaves. Use floating row covers early in the season and a layer of mulch to make it harder for them to jump from soil to foliage.
Wireworms: Larvae that tunnel into tubers. Avoid planting potatoes right after sod or grassy areas, and consider whole seed potatoes rather than cut pieces in problem beds.
General prevention: Rotate away from potatoes and tomatoes for at least three years, and keep soil life healthy with compost instead of heavy synthetic fertilizers.
A quick walk through the potato patch two or three times a week usually catches most issues while they’re still easy to control by hand.
Pest controlOrganic methodsColorado beetlesFlea beetles
For good storage potatoes, focus on three things: keep developing tubers buried, don’t rush the main harvest, and cure what you dig before tucking it away.
Hilling: Start when plants are 6–8 inches tall. Pull soil, compost, or mulch up around the stems and bury the lower leaves. Repeat as they grow until the hills reach roughly 10–12 inches high.
Harvest timing: Once the vines have completely died back and turned brown, wait another 2–3 weeks. This gives skins time to toughen and improves storage.
Digging: Use a fork, start a bit away from the main stem, and lift gently so you don’t spear tubers. Let freshly dug potatoes dry in the shade for a few hours.
Curing & storage: Cure in a dark, airy spot at 50–60 °F for 10–14 days, then move the best potatoes to a cool spot (around 35–40 °F) in paper bags, crates, or baskets.
Done this way, you go from a dusty heap on the tarp to a steady supply that holds up through a big stretch of the cool season.
Paul Stark is one of the gardeners behind The Bright Garden, where he shares hands-on, honest advice for growing with nature. A passionate conservationist, Paul has planted over 100,000 trees in Madagascar to help fight deforestation. He’s also a former marine mammal rescuer. These days, you’ll find him in the garden with dirt under his nails, growing seedlings.
Disclosure: This post may contain affiliate links. That means if you click and buy, The Bright Garden may earn a small commission, at no extra cost to you. We only recommend products we’ve vetted and believe will benefit our readers.
{% if featuredImage and featuredImage != "" %}
{% endif %}
{% if excerpt %}