The Art of <a rel="nofollow" href="https://thebrightgarden.com/trees-and-shrubs/tree-grafting/">Grafting</a> Fruit Trees | The Bright Garden
Interactive Guide · Fruit Tree Craft
How to Graft Fruit Trees
A single apple tree can grow red, green, and golden fruit on separate branches. A plum can bear three shades by summer. This is not horticultural magic — it is the oldest trick in the orchardist's book, and any patient gardener with a sharp knife can learn it.
You can buy a tree. You can plant a seed. Why pick up a knife instead? Grafting solves three problems that seed-grown trees can't.
01
A named variety, guaranteed
Plant an apple seed and you will not get that apple. Cross-pollination scrambles the genetics, so every seedling is a lottery ticket — usually a disappointing one, and often a seven-year wait. Grafting clones an exact variety onto new roots, so a Honeycrisp stays a Honeycrisp and a Santa Rosa plum tastes the way it is meant to.
02
Many fruits on one small tree
The signature trick. A single rootstock can carry two, three, or even a dozen different scions — one branch bearing Pink Lady, another Fuji, another Granny Smith. Perfect for small yards where planting five separate trees is not an option, and a genuinely delightful surprise for anyone who walks into your garden in September.
03
A second life for old trees
Inherited an unproductive tree? Got one whose fruit you never liked? You can cut it back and graft better varieties onto the existing trunk. The mature root system puts its full energy behind the new branches, and you can be eating the new fruit within a season or two — years faster than planting fresh.
From the garden
One tree, two flowers
Grafting reaches well beyond the orchard. Many of the most beautiful ornamental trees you pass on a morning walk have quietly been grafted — especially flowering ones, where growers chase a precise bloom colour and form on reliable, vigorous roots.
The pink half, mid-April.
In our own garden in San Marcos stands a Pink Bauhinia — an orchid tree — that carries two fused trunks rising from a single base. One trunk blooms in deep rose-pink each spring, petals curling back like a lily's, yellow stamens thrust forward into the sun. The other trunk, a few feet away but sharing the same root system, blooms the palest cream white.
Crouch down at the base of the tree and the story is written in plain sight. Two trunks rise from a common crown, knitted together where someone once made a cut and bound two saplings into one. The seam is still faintly visible — a slight hip in the bark, an old wound healed decades ago but never quite erased.
It is grafting as quiet theatre. No fruit to harvest, no summer urgency, no knife-work to redo if a bud shrivels. Just the annual show of two colours sharing one set of roots, a trick played on the tree so slowly and so successfully that the tree itself has forgotten it was ever two. The pink side flowers a week or two before the white side, so for a few days in spring the whole canopy runs from hot rose through soft peach to pale cream as the blooms unfurl in sequence — something no single ungrafted tree could ever do on its own.
The same cambium-to-cambium logic applies whether you are chasing a better apple or a second flower colour. The rules do not care what the tree is for.
The One Thing To Understand
The whole secret is a thin green line
Every grafting technique — all five of them — exists to solve exactly one problem: get the cambium of one tree to touch the cambium of another. Click the layers to see why.
The one that matters
Cambium
A layer of actively dividing cells just one cell thick, sandwiched between the bark and the wood. This is the tree's growth zone — the factory that builds new xylem on its inner face and new phloem on its outer face every season. When you graft, you are lining up the cambium of your scion with the cambium of your rootstock so they fuse into a single, continuous growth zone. Miss by a few millimetres and the graft will fail.
Why alignment is everything
Two cuts, two outcomes. The only difference is whether the green rings meet.
Cambium aligned
Graft heals. Tree fuses into one.
Cambium missed
Scion dies. Wound closes without it.
How I learned
The avocado that taught me everything
Long before I knew the word, grafting arrived in my life through one stubborn potted tree — and a neighbour who, very kindly, broke some news.
Nursery avocado grafts — blue tape, new leaves.
A few years ago, in Oregon, I did what almost everyone does at some point: my wife suspended a leftover avocado pit on toothpicks over a jar of water, waited longer than seemed reasonable, and eventually transplanted a small, stubborn green shoot into a pot. When we finally came south to California and into a place with actual soil, the tree went straight into the sunniest corner of the yard. I was, I admit, immensely proud. I had carried a tree across a state line.
Then my gardener looked at me kindly, and explained that seed-grown avocados rarely fruit well — and when they eventually do fruit, it can take ten or fifteen years, and the fruit is almost never what you had been hoping for. Cross-pollinated, unpredictable, often small or stringy or simply not good. To get reliable avocados in any human timeframe, he said, you graft a named variety onto your seedling. Hass, Fuerte, Reed — pick whichever you fancy.
That was the first time I really understood what grafting was for. Not a professional specialty, not an abstract horticultural curiosity, but a practical tool for turning my particular tree into something that would one day feed me. The seedling I had carried across the country was not an end — it was a rootstock, waiting for its variety.
Almost every avocado you have ever eaten came from a grafted tree. Seedlings are a genetic lottery; cultivated varieties — Hass most of all — are clones, propagated by graft onto vigorous, disease-resistant roots for more than half a century now.
Pick your scion and rootstock to see whether the pairing works.
Pick a scion and rootstock above
The result will appear here once both are selected — with an explanation of how closely related the two species are and what that means for your graft.
Taxonomic relationship
Family—
Genus—
Species—
The closer the match runs down the pyramid, the better the odds.
Meet your materials — scion wood of several varieties, sample cuts, and the one knife that does most of the work.
The Five Methods
Every graft in the orchardist's toolkit
Each technique solves a different problem. The same two cuts that work beautifully on a pencil-thin twig are completely wrong for a three-inch stump. Pick the method that fits your wood, your season, and your nerve.
The jigsaw puzzle graft
Whip & Tongue
The classic dormant-season graft, and the one most orchardists learn first. Two pencil-thick sticks — one scion, one rootstock — are sliced on matching long diagonals, locked together with a notched tongue, and wrapped tight. Done well, the seam is nearly invisible a year later.
Best for New treesSeason Late winterWood Matched, pencilDifficulty Intermediate
Step by step
Step 1 of 6
Match your wood
Choose a scion of the variety you want and a rootstock of similar diameter — both around the thickness of a pencil. The closer the match, the better the cambium layers will line up when you put them back together. Scion wood should be one-year growth, dormant, cut in winter and kept chilled.
Tip. If diameters differ, align the cambium on one side rather than centering. Contact on one side is enough.
Slant-cut the rootstock
With a single smooth pull of a sharp knife, take a long diagonal slice off the top of the rootstock. Aim for a cut surface about 1.5 times the diameter of the stem. One pass, not a sawing motion — the cleaner the face, the better the heal.
Tip. Brace the stem against your thumb and draw the knife toward the pad of the thumb, never across your skin.
Mirror the cut on the scion
Make an identical slanting cut on the base of the scion. The two faces should be close enough in length and angle that when you hold them up, they would fit together like puzzle pieces. Don't rush this one — a sloppy scion cut is the most common cause of failure.
Cut the tongue on each face
About a third of the way down each diagonal, make a second cut that goes straight into the wood, following the grain, producing a small notch — the tongue. One on the scion, one mirrored on the rootstock. These tongues are what hold the two pieces together mechanically while they heal.
Tip. Don't cut tongues too long. A quarter-inch slit is plenty. Deeper and you risk splitting the wood.
Interlock the two halves
Slide the scion tongue into the rootstock notch and pull them gently together until the diagonals meet flush. Look along the seam: the bark lines should match on at least one side. That is your cambium making contact — the only thing that actually matters.
Wrap and label
Bind the union firmly with grafting tape, starting below the cut and overlapping up and over the top. Cover every bit of exposed wood. Label the graft with variety and date. Now wait — the graft should take callous in four to six weeks, with buds breaking later in spring.
Common mistakes
Sawing instead of slicing
Multiple cuts on the same face leave ridges. The cambium layers can't meet cleanly. One fluid draw of the knife, every time.
Mismatched diameters
If the scion is noticeably thinner than the rootstock, at least line up one side so the cambium touches there. Don't center it.
Loose wrap
A wrap that lets the tongues shift breaks the healing callous. Tight, overlapping, no gaps.
Big stump meets small scion
Cleft Graft
When the rootstock is far thicker than your scion wood, you can't slice them both at the same angle — the geometry simply doesn't work. The cleft graft solves this by splitting the rootstock down the middle and wedging a scion (or two) into the crack. The go-to technique for topworking an old tree.
Best for Thick rootstockSeason Late winterWood MismatchedDifficulty Beginner-friendly
Step by step
Step 1 of 6
Prepare stock and scion
Cut your rootstock cleanly across with a saw, leaving a smooth flat top. The rootstock can be anything from a thumb's width to two inches or more. Have your scions ready — each with three to four healthy dormant buds, cut fresh on the morning of grafting or pulled from cold storage.
Tip. Smooth any saw tear-out on the top edge with a sharp knife. Ragged edges don't heal well.
Split the stock
With a grafting chisel, heavy knife, or a thin blade tapped with a mallet, split the rootstock vertically through the middle. The cleft should run about one and a half to two inches deep. Go straight down the axis of the stem — a skewed split creates uneven pressure later.
Tip. A single firm tap is better than many small ones. The cleaner the split, the cleaner the eventual heal.
Shape the scion into a wedge
Take a pencil-thick scion and cut the bottom two inches into a long, tapered wedge. Make the outer edge a touch thicker than the inner edge — this makes sure the pressure of the cleft closing squeezes the scion tight where the bark lies, which is exactly where the cambium needs contact.
Wedge the cleft open
Slip a screwdriver or wedge into the cleft and pry it open just enough to accept the scion. The rootstock's natural springiness is what will clamp the scion in place once you remove the wedge — don't open it so wide that you crush the bark or break the limb.
Insert and align
Slide a scion into each side of the cleft so its outer bark sits flush with the outer bark of the rootstock. If the stock is wide, insert two scions — one on each edge. This is the critical moment. Cambium must meet cambium, which means the bark lines of scion and stock must sit on the same plane, not stepped.
Tip. Tilt the scion very slightly inward at the top so the cambium crosses the rootstock cambium. This creates two points of contact instead of one.
Seal every opening
Pull the wedge. The cleft closes on the scions. Coat every exposed surface — the top of the stock, the sides of the cleft where it meets the scion, any gaps — with grafting wax or paste. Wrap tape around the union for extra security. If both scions take, the weaker one can be pruned off the following year.
Common mistakes
Centering the scion
Planting the scion in the middle of the cleft means its cambium is buried in dead wood. Push it to the outer edge where bark meets bark.
Sealing poorly
Any unsealed gap lets the scion dry out or rot set in. Wax the top surface, the seams, and up around the scion base.
Cleft too deep
A split running the whole length of the limb won't close back on the scion and can't heal. Two inches is plenty.
A new life for an old trunk
Bark Graft
The specialist technique for topworking mature trees. When the rootstock is thick enough that splitting it seems violent — two, three, or five inches across — you peel the bark back like a pocket and slip the scion in behind it. It relies on the bark slipping freely, which only happens once the sap starts moving in spring.
Best for Reviving old treesSeason Early springWood Thick rootstockDifficulty Approachable
Step by step
Step 1 of 6
Cut the rootstock clean
Saw off the old limb or top the trunk at the height you want the new grafts to emerge. Trim the sawn surface smooth with a sharp knife — jagged saw teeth leave wound tissue the graft can't heal across. Choose a limb at least as thick as your thumb so there's enough bark real estate to work with.
Tip. Time this right. The bark must be "slipping" — sap flowing, buds swelling. Try a test cut: if the bark peels away easily, you're ready.
Slit the bark
With the tip of your knife, make a vertical cut through the bark only, running down about two inches from the top of the stock. You want to cut through the bark and stop at the wood underneath. The wood shouldn't bear any knife mark. On a large stump, space two, three, or four such slits evenly around the circumference.
Lift a bark pocket
Use the dull back of your blade, a thumbnail, or the brass tongue of a grafting knife to gently peel the bark back from one side of the slit. It should come away from the wood like lifting the flap of an envelope. This forms the pocket into which the scion will slip.
Tip. If the bark tears, sticks, or refuses to lift, you are too early. Come back in a week or two. Bark graft is unforgiving of timing.
Prepare the scion
Cut a long, tapered bevel on one side of the base of your scion stick — about an inch and a half, shallow and smooth. On the opposite side, make a much shorter bevel. The long face will press against the exposed wood of the rootstock, while the short face sits under the lifted bark flap. This is where cambium meets cambium.
Slide the scion home
Push the scion firmly down into the pocket behind the bark flap. The short bevel disappears under the flap; the long bevel presses flat against the bare wood. The top of the bevel should sit flush with the top of the rootstock stub. A good fit takes pressure — if it slides in with no resistance, the scion is too thin for that pocket.
Wrap tight, seal tighter
Bind the whole union firmly with grafting tape, starting below the scions and wrapping up, flattening the bark flaps against the scions. Seal the top cut with wax or paste, covering every exposed wood surface. On larger stumps, shelter the scions with a bag or foil sleeve for the first few weeks, especially if the spring sun is strong.
Common mistakes
Grafting too early
If the bark won't slip, the method can't work. Wait for sap flow. Test with a small nick before committing to the main cut.
Leaving no nurse branch
Cutting a mature tree all the way back with no foliage risks losing the tree if grafts fail. Leave one or two small lower branches as insurance.
Skipping the seal
A large cut surface bleeds sap and dries out fast. An unsealed top kills more bark grafts than bad cuts do.
A single bud, a summer pocket
T-Bud Grafting
The grafter's summer method. You take a single dormant bud — a tiny shield of bark and cambium with one plump bud at its centre — and slip it under a T-shaped cut in the bark of an existing branch. Because the only scion material is a bud, you can try fifty grafts in an afternoon.
Best for Adding varietiesSeason Late summerWood Single budDifficulty Beginner-friendly
Step by step
Step 1 of 6
Pick your bud
From this year's growth on the scion tree, cut a shoot and strip off the leaves (leaving short leaf stalks as handles). Work in the middle third of the shoot — apical buds at the tip are immature, buds near the base are too woody. Look for a plump, well-formed bud sitting in the angle between a leaf stalk and the stem.
Tip. Keep the stripped scion wood cool and in a damp cloth. A bud that has dried out in the sun won't take.
Cut the bud shield
Slice horizontally across the scion about half an inch above your chosen bud. Then slice shallowly beneath the bark, starting half an inch below the bud and drawing the knife up and under until it meets your first cut. Lift the bud shield off with the leaf-stalk handle — you now have bud, bark, cambium, and just a whisper of wood.
Tip. Don't touch the inner green face of the shield with your fingers. Skin oils can interfere with healing. Handle only by the leaf stalk.
Cut a T in the rootstock
Choose a smooth section of bark on the branch you want to graft to. Make a vertical slit about an inch long, then a shorter horizontal slit across the top of it, forming a capital T. Cut through bark only, not into the wood. The bark should almost open of its own accord if the timing is right.
Lift the bark flaps
With your knife tip or a thumbnail, peel the two flaps of bark back on either side of the vertical slit. They fold open like curtains, exposing the pale green cambium underneath. This is the pocket that will accept the bud shield — no wider than necessary.
Slide the bud in
Tuck the bud shield under the lifted flaps with the bud facing up and outward. Push it down until the top of the shield sits flush against the horizontal cut. Settle the bark flaps back over the edges of the shield, leaving only the bud itself poking out through the middle.
Wrap, but leave the bud free
Bind firmly with grafting tape above and below the bud, covering all the cut edges. Never wrap over the bud itself — it needs to breathe. After about a month, peek under the wrap. If the bud is still green and plump, the graft took. Don't expect growth until spring; the bud will stay dormant through winter and push out as a new branch next season.
Tip. In spring, once growth is confirmed, cut the rootstock branch off just above your bud to force all the energy into your new variety.
Common mistakes
Too much wood on the shield
A bud shield should be bark with just a trace of wood. Thick wood won't fit flat under the bark flaps and breaks cambium contact.
Wrapping over the bud
Suffocating the bud kills it. Always leave a clean gap in the wrapping directly over the bud itself.
Forgetting to cut back
If you leave the rootstock branch growing above a successful bud graft, the bud stays dormant. Head back the branch once the graft takes.
T-bud's dependable cousin
Chip Budding
If T-bud fails on you, or if the bark just refuses to slip, chip budding will rescue the project. Instead of lifting bark flaps, you carve a matching chip of wood out of the rootstock and replace it with an identical chip from the scion — bud and all. More forgiving, and generally stronger by the next spring.
Best for Reliable bud graftsSeason Mid to late summerWood Single budDifficulty Beginner-friendly
Step by step
Step 1 of 6
Pick your bud, as before
Same as for T-budding: a shoot of this year's growth, leaves stripped off (leaf stalks kept as handles), and a fat bud from the middle of the stick. Chip budding works particularly well late in summer when the bark is no longer slipping cleanly — precisely the conditions that make T-budding unreliable.
Cut down at 45 degrees, below the bud
About a third of an inch below the bud, drive the tip of the knife in at a 45-degree angle, cutting down into the wood to a depth of roughly an eighth of an inch. This forms the bottom face of the chip — the lip the chip will ultimately sit on when you reinsert it.
Tip. A sharp knife makes this one clean cut. Dull blades push the wood fibres aside instead of cutting them, and the chip won't come away cleanly.
Slice down from above
About an inch above the bud, drop the knife to the same depth and draw a single slicing stroke down the length of the stick, all the way until the blade meets the bottom cut you just made. The goal is one long, smooth cut — it's what gives chip budding its reliable, flat mating surface.
Lift the chip away
Lift the chip off using the leaf stalk as a handle. You should now hold a small wedge of bark, cambium, and a sliver of wood — with your chosen bud sitting in the middle of it. Set it aside on a clean surface. Do not let it dry out, and do not touch the cut faces with your fingers.
Carve a matching socket in the rootstock
On the rootstock, use the chip as a template. Make the same two cuts in the bark of the branch you want to graft onto, producing a socket exactly the shape of your chip. Pop out the matching wood sliver — and slide your bud chip home. The fit should be snug, with cambium meeting cambium on at least one side.
Tip. If the chip is slightly smaller than the socket on one dimension, align it to one side so the cambium on that edge touches. Don't float it in the middle.
Wrap over everything
Unlike a T-bud, chip budding wraps cover the entire chip, bud and all. The bud won't grow this season anyway; what matters now is preventing drying out and holding the chip tight against the rootstock. Use stretchy grafting tape or parafilm. Peel back the wrap in early spring — a healthy bud will look green and plump, and is ready to be released.
Common mistakes
Chip doesn't match socket
Rough, uneven cuts mean the chip floats instead of fitting. Cut the rootstock socket while you can still reference the chip as a template.
Skipping the bud handle
Without the leaf stalk as a handle, you end up touching the cut face. Skin oils on exposed cambium are a graft killer.
Wrapping too loose
Chip budding relies on tape pressure to hold the chip seated. Any slack and the chip shifts, cambium contact is lost, graft dies.
When to graft
A year in grafting windows
The same method won't work in December and August. Every technique has its season, dictated by sap flow, bud stage, and weather. Here is how the year falls out.
Jan
Feb
Mar
Apr
May
Jun
Jul
Aug
Sep
Oct
Nov
Dec
Season
Whip & Tongue
Cleft Graft
Bark Graft
T-Bud
Chip Budding
Whip & Tongue
Cleft
Bark
T-Bud
Chip Bud
peakedge
Dates shift a week or two by latitude — in warmer zones like coastal California, the dormant window opens earlier and the summer bud window runs longer. Watch the tree, not the calendar.
When Things Go Sideways
Troubleshooting a failed graft
Most grafts fail for one of a small handful of reasons. If you can diagnose what went wrong, next spring's success rate will climb. Expand any problem below to see the usual cause and the fix.
Likely cause
The wrap left gaps, or the seal was never made. Air reached the cut surfaces faster than the cambium could callous, and the scion shrivelled before it had a chance.
What to do next time
Wrap firmly and overlap each turn so there are no visible gaps. Paint any exposed wood with grafting wax or paste. On bark grafts especially, treat the top cut like a closed wound — no light, no air.
Likely cause
Classic false start. The scion was living off its own stored sugars when it leafed out, but the cambium never actually fused, so no water or nutrients flowed through. Once the reserves were spent, the leaves wilted.
What to do next time
This is almost always a cambium alignment problem. Before wrapping, make sure at least one edge of the scion's bark lines up exactly with the rootstock's bark. Don't be tricked by the scion's initial vigour — success is measured at four to six weeks, not four to six days.
Likely cause
Sap is not flowing strongly enough. For bark grafts and T-buds, the rootstock must be actively growing — that's what separates the bark cleanly from the wood beneath.
What to do next time
Check timing. For spring bark grafts, wait until buds have broken and new leaves are emerging. For summer bud grafts, work when the tree is still pushing growth, usually July into August. If the bark won't slip, switch methods — chip budding works wood-to-wood and doesn't need slipping bark.
Likely cause
The rootstock is healthy and still trying to put its energy into its own branches, not yours. If you leave those suckers, they will outgrow the scion and eventually starve it of sap.
What to do next time
Rub off rootstock buds below the graft as soon as you see them. Do this weekly in the growing season. Your scion needs every drop of sap the rootstock is sending up.
Likely cause
Wind. The graft was healing on the inside while the outside was still mechanically fragile. A gust caught a long new shoot and the union couldn't hold.
What to do next time
Tie vigorous new scion growth to a small stake or to the rootstock beside it — use soft string and leave slack. The union needs a full growing season before it can trust itself to hold against wind load.
Likely cause
Fruit set in year one is a trap. Developing fruit draws enormous energy from a small, partly-healed union, often leaving nothing for the scion itself to sustain its leaves once the fruit matures.
What to do next time
Pinch off any flowers that form on a newly grafted scion in its first year — ideally the second year too. The tree needs to put its energy into wood, roots, and healing first, fruit later.
Likely cause
Usually one of three things: your knife was dull, your scion wood was not properly dormant (or had dried out in storage), or you were working too late in the season for the method chosen.
What to do next time
Strop your knife to a shaving edge before every session. Collect scion wood in deep winter when the tree is fully dormant, and keep it in a zip bag with a damp paper towel in the fridge (away from any ripening fruit, which releases ethylene and will kill scions). And double-check method timing against the calendar above. Grafting rewards precision over enthusiasm.
Likely cause
Not usually. A small swelling at a graft is the tree's callus tissue — the new wound wood bridging the scion and rootstock. Most unions show a visible collar for the life of the tree. Only when the scion is noticeably smaller than the stock below (or vice versa) is there a compatibility problem.
What to do next time
Nothing. Let it be. If the collar gets extreme over years and the tree is struggling, the scion-rootstock combination may be marginally incompatible; the graft may weaken eventually. But a modest bump is perfectly normal.
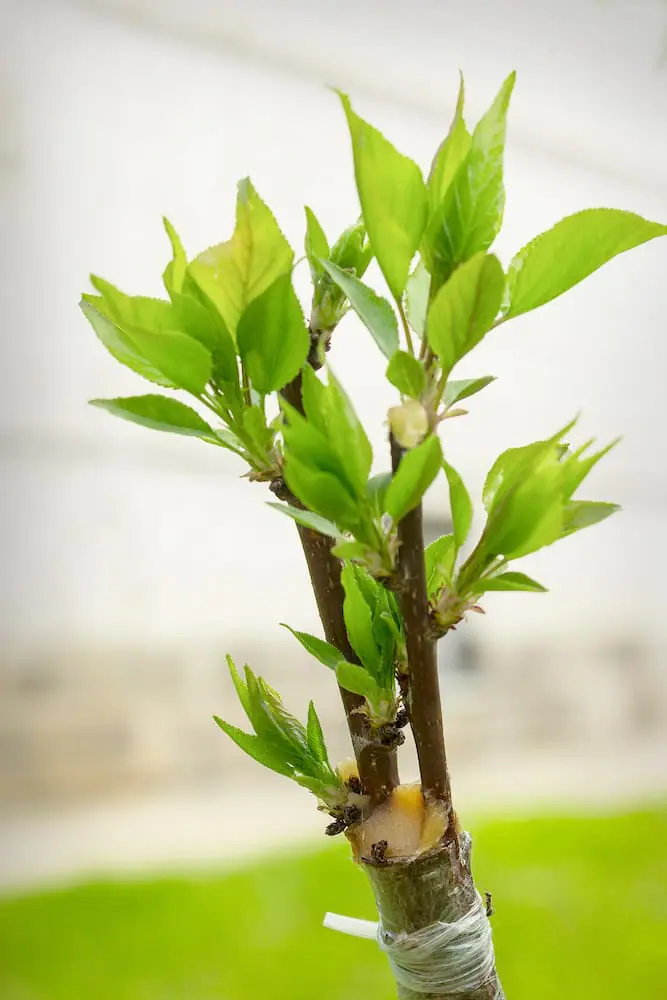
The reward, a season later.
The Kit
What you actually need
Grafting is not a hobby of endless gadgets. Six items will cover every technique on this page — and honestly, a sharp knife alone will do most of the work.
Grafting knife
The one tool you cannot cheat on. Single-bevel, stainless, scary sharp. A ground-on-one-side blade lets you take perfectly flat slices — the whole game. Spend money here.
Essential
Grafting tape
Stretchy parafilm or purpose-made grafting tape, which hugs the union and biodegrades in a season. Rubber bands and florist tape work in a pinch but need removing.
Essential
Grafting paste or wax
Seals the top of cleft and bark grafts where tape can't reach. Avoid thick tar-based compounds — they interfere with healing. Look for soft, pliable waxes.
For cleft & bark
Labels
Write the variety name, the date, and the rootstock on a weatherproof plastic or metal tag. The most foolish mistake is knowing you grafted five varieties and forgetting which went where.
Essential
Pruning saw
Necessary only when the rootstock is too large to take with secateurs — a three-inch bark graft stump, for instance. A folding saw with a curved, fine-tooth blade gives the cleanest cut.
For mature trees
Sharpening stone
A dull knife tears wood fibres instead of slicing them, and torn fibres will not heal. A fine waterstone or ceramic rod keeps the edge at shaving sharpness throughout a session.
Recommended
Now for the real work
Grafting rewards the patient and the practised. One fine spring you will slice a bud cleanly, wrap it right, and watch it break in April — and it will feel like something close to magic.
Do ten grafts in an afternoon rather than one perfect graft in a morning. Volume buys you the muscle memory that no book or video can teach. Failed grafts tell you more than successful ones — where the cambium missed, where the wrap slipped, where the timing was wrong.
Nothing sharpens skill faster than working alongside someone who already has it. Ask at your local Master Gardener chapter, orchard guild, or community fruit-tree group. An afternoon with a mentor beats a season of videos.